Let’s be honest: nobody wants to spend two hours sitting in a stiff salon chair while a stranger files their nails into oblivion for the price of a small car payment. We all want those Pinterest-perfect nails, but our bank accounts usually beg for mercy by the time June rolls around. Why not take matters into your own hands—literally? Coffin nails, or “ballerina” nails if you’re feeling fancy, offer the perfect canvas for summer creativity because they provide so much surface area.
I remember my first attempt at shaping my own coffin nails; I ended up with one hand looking like a set of claws and the other looking like a failed carpentry project. But after a few trials (and many errors), I discovered that you don’t need a license to create something spectacular. Ready to save some cash and look like a total pro? Let’s get into the best simple summer coffin nail designs you can do at home.
The Essential DIY Coffin Toolkit
Before we jump into the art, we need to talk about your foundation. You wouldn’t paint a masterpiece on a piece of shredded cardboard, would you? Getting the coffin shape right at home requires the right tools and a little bit of patience.
1. Shaping Your Canvas
The coffin shape features tapered sides and a flat, squared-off tip. To achieve this, file the sides of your nails at a sharp inward angle. Once you reach the desired width at the top, file the tip straight across to create that iconic flat edge. High-grit files work best for this because they remove bulk quickly without leaving jagged edges.
2. Must-Have Supplies
- A 180-grit nail file: This is your best friend for shaping the side walls.
- A fine-grit buffer: Use this to smooth the surface so your polish doesn’t look lumpy.
- Clean-up brushes: Grab a cheap, thin eyeliner brush and some acetone to fix those inevitable “oops” moments.
- A long-lasting top coat: Never skip the top coat if you want your hard work to last longer than a beach trip.
13 Simple Summer Coffin Nail Designs
1. The Neon French Twist
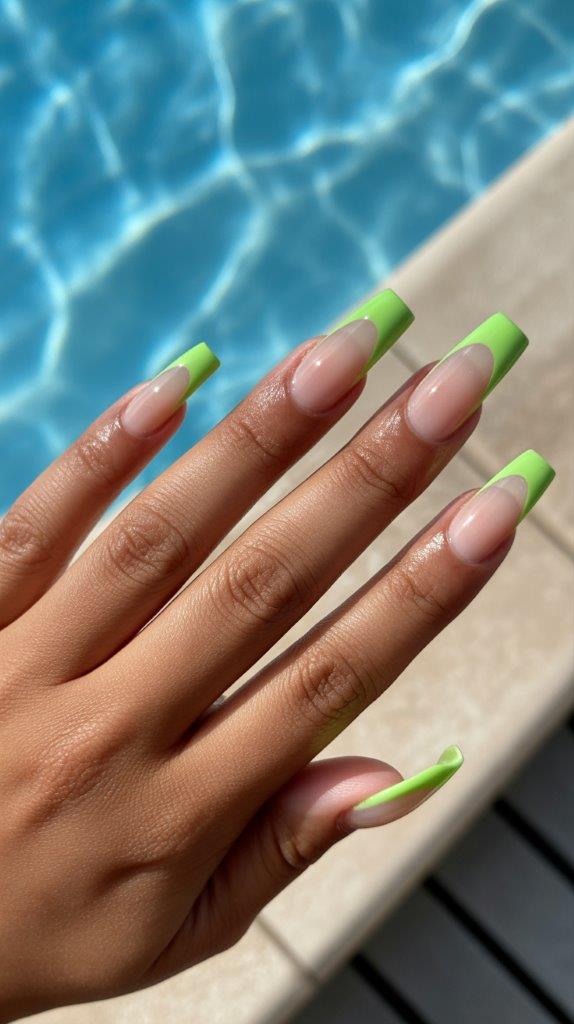
Traditional French manicures feel a bit “wedding season,” don’t they? Give yours a summer upgrade by swapping the white tips for electric neon hues like lime green or hot pink. Use a rubber band or a French tip sticker to guide your line if your hands shake as much as mine after three iced coffees.
The contrast between a nude base and a bright tip makes your tan pop instantly. This design looks incredibly intentional but only takes about ten minutes of actual work. Bold neon colors define the summer vibe better than almost anything else.
2. Pastel Skittles

Who says you have to pick just one color? If you’re feeling indecisive (which is my permanent state of being), the Skittles manicure is your savior. Pick five different pastel shades—think mint, lavender, lemon, baby blue, and peach—and paint one on each finger.
This design requires zero “artistic talent” but looks like a curated masterpiece. Pastels offer a soft, dreamy look that perfectly complements a flowery sundress or a casual denim-shorts-and-white-tee combo. Is there anything easier than just painting your nails?
3. Minimalist Daisy Accents
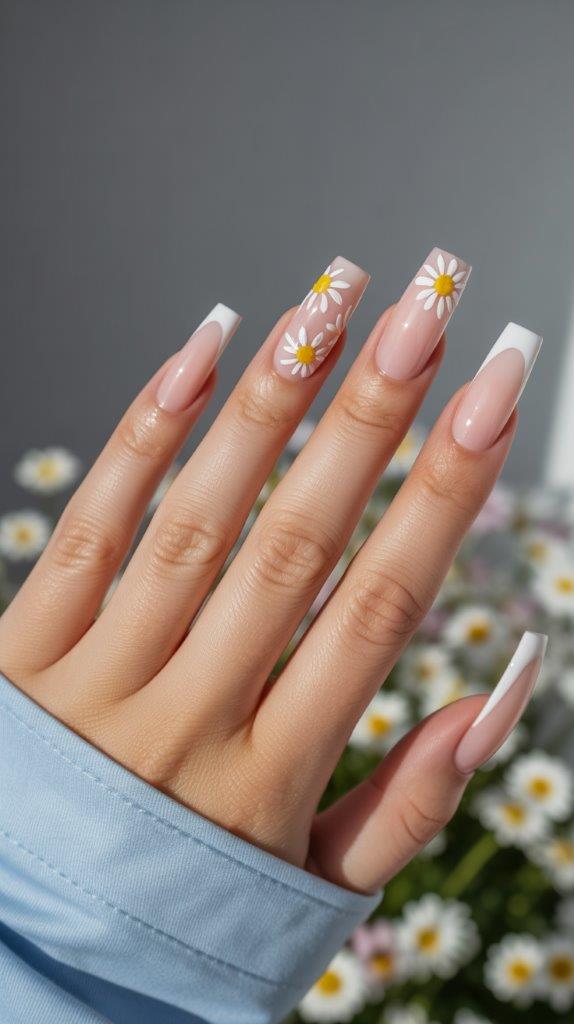
Floral patterns often look intimidating, but daisies are the secret weapon of the DIY world. You only need a toothpick or a dotting tool to make this happen. Apply a clear or nude base coat, then place five white dots in a circle and one yellow dot in the middle.
I usually put one or two daisies on my ring finger and thumb to keep it subtle. The negative space keeps the look modern rather than looking like a tablecloth from the 70s. Plus, you can hide any minor imperfections in the flower petals because, hey, nature isn’t perfect either! 🙂
4. Glazed Donut 2.0

We can thank Hailey Bieber for the “Glazed Donut” obsession, and honestly, it’s not going anywhere this summer. To do this at home, apply one thin coat of a sheer, milky white polish. Once that dries, rub a bit of iridescent chrome powder over the top with a sponge applicator.
This design glows beautifully under the summer sun. It’s sophisticated enough for a summer wedding but cool enough for a pool party. The shimmer hides small ridges in your natural nails, which is a massive win for those of us who forget to use a buffer.
5. Abstract Summer Swirls

Abstract swirls are the ultimate “I’m an artist” move that requires almost zero precision. Take a thin detail brush and drag a bright color in a wavy line across your nail. Layer a second color next to it for a more dynamic look.
Ever wondered why this works so well? It’s because there are no mistakes in abstract art. If a line goes a little wonky, just call it “flow.” Use colors like turquoise and orange for a high-energy summer contrast that screams tropical vacation.
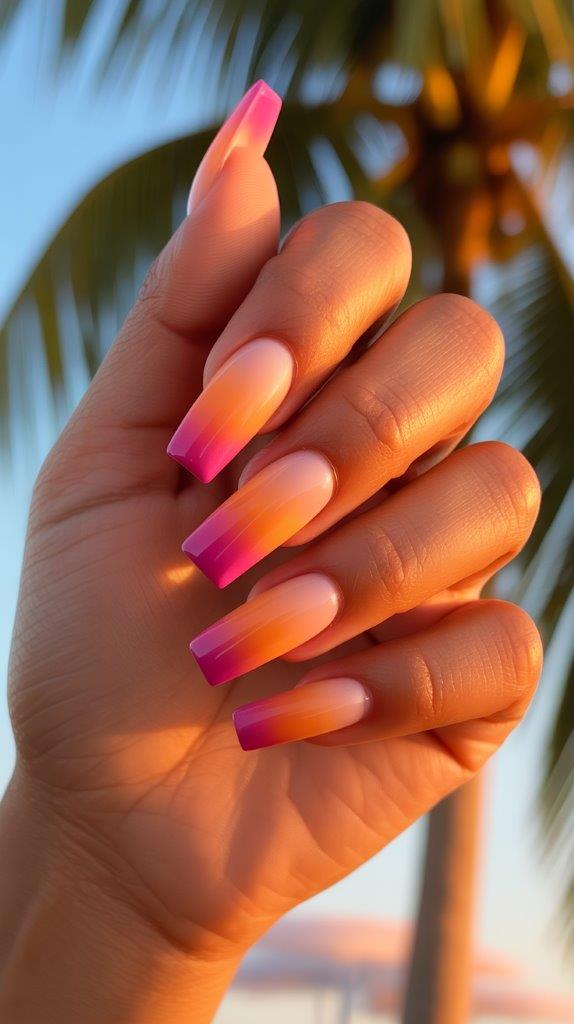
6. The “Sunset” Ombre
Ombre might sound scary, but the sponge technique makes it foolproof. Paint a makeup sponge with two horizontal stripes—maybe a bright orange and a deep pink. Press the sponge onto your nail repeatedly until the colors blend together.
The coffin shape provides plenty of vertical space for a smooth transition. Clean up your cuticles immediately with acetone, as the sponging process gets messy. IMO, this is the most professional-looking design you can achieve with basic household items.
7. Gold Foil Glam

If you want to feel like a Greek goddess lounging by the Mediterranean, gold foil is your answer. Apply a neutral base color—white or tan works wonders—and then press small flakes of gold leaf onto the tacky polish.
You don’t need a pattern; just scatter them randomly. Seal everything with a thick top coat to prevent the foil from peeling off. It looks expensive, but you can buy a massive jar of gold foil online for less than a sandwich.
8. Milky Blue Waves

Nothing says summer like the ocean. Paint your coffin nails a sheer, milky white, then use a toothpick to swirl in a tiny bit of light blue polish while the white is still wet. This “wet-on-wet” technique creates a marble effect that looks like moving water.
It’s calming, chic, and surprisingly easy once you get the hang of the swirl. Avoid over-mixing the colors, or you’ll just end up with a muddy light blue mess. Keep the strokes light and airy for the best results.
9. Checkerboard Accent
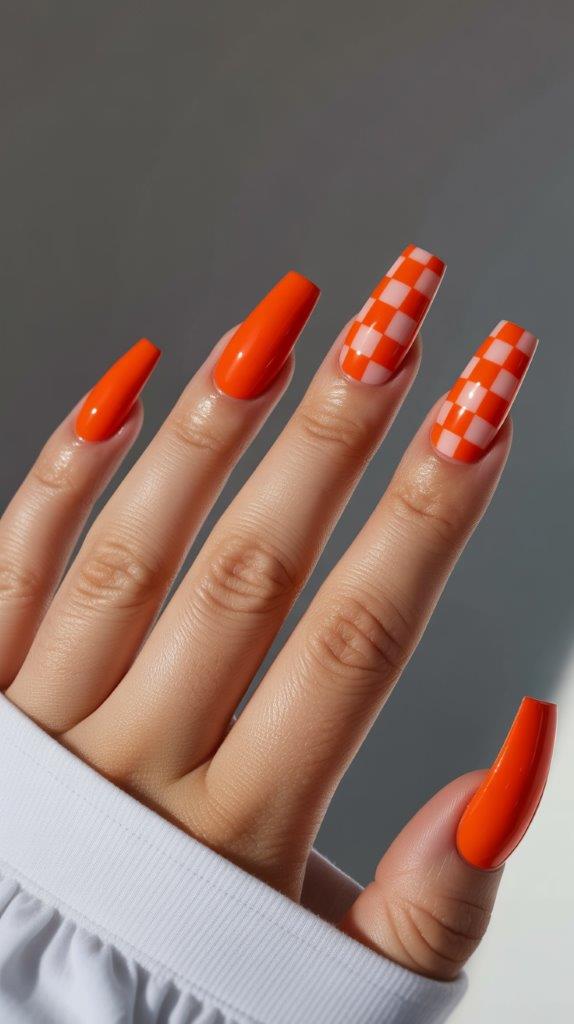
The checkerboard trend is everywhere right now, from rugs to phone cases. You can bring this to your nails by using a tiny brush to paint small squares on one or two accent nails. I love using a “creamsicle” color scheme—orange and white.
It’s a bit more time-consuming than a solid color, but the payoff is huge. Use a matte top coat for a truly modern, high-fashion finish. Does it take a steady hand? Yes. Is it worth the three times you’ll have to restart? Absolutely.
10. Minimalist Dot Work

If you have about thirty seconds to do your nails, this is the design for you. Paint your nails a solid, opaque color—like a deep terracotta or a bright yellow. Use a dotting tool to place a single, contrasting dot at the base of each nail near the cuticle.
It’s subtle, high-end, and very “cool girl.” The single dot draws the eye and makes the coffin shape look even longer and more elegant. FYI, a bobby pin works perfectly as a dotting tool if you don’t own a professional kit! 🙂
11. Vertical Color Blocking

Vertical lines make your nails look even longer, which is the whole point of the coffin shape, right? Paint one half of your nail a soft lilac and the other half a bright coral. Use a piece of striping tape to get that perfectly straight line down the center.
Bold color blocking creates a graphic look that stands out in photos. It’s a great way to use those colors in your collection that usually don’t get much love. Just make sure the first color is completely dry before applying the tape, or you’ll pull the polish right off.
12. Tortoiseshell Tips
Tortoiseshell looks complicated, but it’s actually just layers of translucent brown and black dots. For a summer twist, don’t do the whole nail. Instead, apply the pattern only to the tips of your coffin nails, leaving the rest clear.
This “French Tortoise” look is incredibly trendy and looks great with gold jewelry. Use a “jelly” polish (sheer tint) for the base of the pattern to get that depth. It’s the ultimate “sophisticated adult” summer nail.
13. Fruit Punch Decals
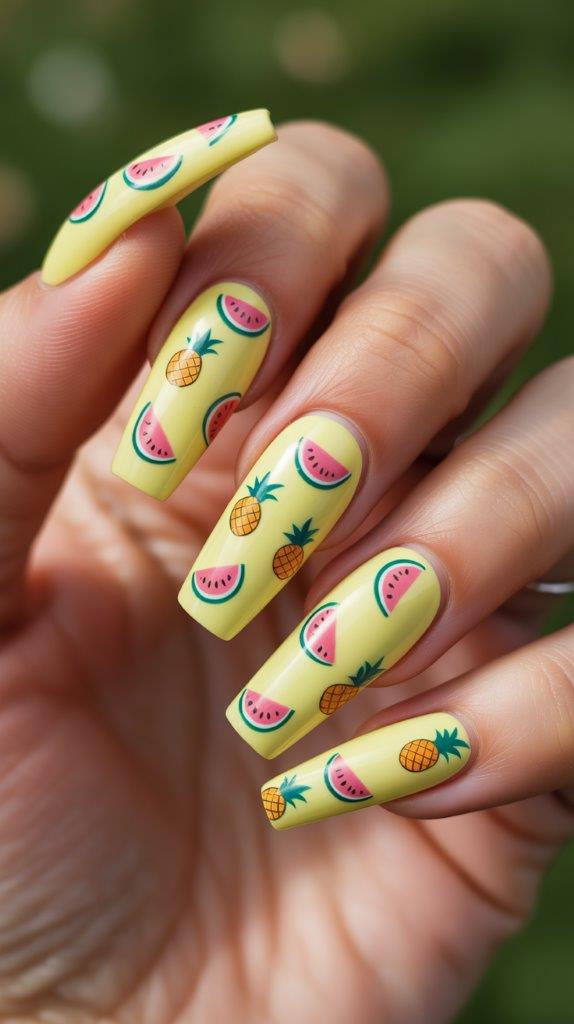
Look, sometimes we just want to have fun. If you aren’t a master painter, buy some tiny fruit decals—think watermelons, strawberries, and pineapples. Stick them onto a clear or pale yellow base and seal them in.
It’s playful, nostalgic, and perfect for a summer BBQ. Decals are the ultimate shortcut to a complex-looking manicure without the hand cramps. Why struggle with a brush when you can just peel and stick?
Pro Tips for the Perfect DIY Manicure
Now that you have your design ideas, let’s talk about execution. Doing your own nails at home is 20% talent and 80% not rushing the process. If you try to do this while distracted by a Netflix cliffhanger, you’re going to smudge something.
The Prep is Non-Negotiable
Dehydrate your nail beds with a quick swipe of rubbing alcohol before you start. This removes natural oils that cause polish to lift and peel. If you skip this, don’t be surprised when your beautiful sunset ombre slides off like a wet sticker two days later.
Thin Layers Over Thick Ones
I know it’s tempting to gloop on the polish to get it done faster. Resist the urge! Multiple thin layers dry faster and last significantly longer than one thick, gooey layer. Thick polish stays soft in the middle for hours, leading to those annoying “bedsheet imprints” if you paint them before sleep.
Caring for Your Coffin Shape
Because coffin nails have those sharp corners, they are more prone to snapping if you’re a bit rough with your hands. Avoid using your nails as tools to open soda cans or scrape off stickers. Treat them like the jewels they are, not like a Swiss Army knife.
Why DIY is Actually Better
Still on the fence about skipping the salon? Think about the freedom. If you chip a nail at home, you can fix it in two minutes. If you chip a salon nail, you have to live with the shame (and the snag) until you can book another appointment. Plus, you get to brag to everyone who asks that you did them yourself.
Saving money feels just as good as a fresh manicure. Those $60 savings add up quickly over a summer. That’s enough for a couple of extra rounds of margaritas at the beach, wouldn’t you say?
Final Thoughts
Getting the perfect simple summer coffin nail designs you can do at home is all about experimenting and having fun. Whether you go for the bold neon French or the lazy (but chic) Skittles look, your nails will be a conversation starter all season long.
Remember, it’s just polish! If you hate the way a design turned out, wipe it off and try again. Practice makes perfect, and by the time August rolls around, you’ll probably be the neighborhood’s unofficial nail tech. So, grab your file, put on your favorite playlist, and start shaping. Which design are you trying first? Whatever it is, I’m sure it’ll look fabulous. Happy painting! 🙂
Leave a Reply
You must be logged in to post a comment.