Okay, Jokes apart. You’ve scrolled through Instagram, you’ve pinned a dozen ideas, and now you’re staring at your own nails, willing them to magically transform into a festive masterpiece. I get it. I’ve been there. The struggle for the perfect Christmas nail art is real, and it’s why we’re here today.
Forget the stress. This year, we’re ditching the complicated snowflakes and the slightly-terrifying Santa faces for a classic that never fails: the holly and the ivy. Or, more specifically, the holly. There’s just something about those glossy green leaves and cheerful red berries that screams festive joy without even trying. It’s elegant, it’s timeless, and honestly, it’s a lot easier to pull off than you might think.
So, grab your favorite cup of cocoa (with extra marshmallows, obviously), and let’s get our hands dirty—figuratively, of course. We’re about to dive into 15 holly-jolly nail designs that will have you feeling festive from your fingertips to your toes.
Why Holly Nails are a Total Holiday Vibe
Before we get to the good stuff, let’s talk about why holly nails are the MVP of Christmas manicures.
First off, they are insanely versatile. You can go from minimalist and chic to full-on glitter bomb, and the holly motif still works. They look amazing on short nails, long nails, almond, square—you name it. Holly doesn’t discriminate.
Secondly, the color combo is a winner. Deep, festive green and pops of bright red against a neutral or bold base? It’s a classic for a reason. It complements every single holiday outfit, from your ugly Christmas sweater to that slinky little black dress for the fancy party.
And finally, let’s talk skill level. Ever tried to paint a reindeer and ended up with a blob that vaguely resembles a brown potato? Yeah, me too. Holly is forgiving. A few simple leaves, a couple of dots for berries, and boom—you look like a nail art pro. It’s the ultimate confidence booster.
Gearing Up: Your Holly Nail Art Toolkit
You don’t need a salon-worth of equipment to create these looks. Most of these designs are totally achievable with a few key tools. Think of this as your pre-flight checklist.
The Non-Negotiables:
- A Good Base and Top Coat: This is the difference between a mani that lasts three days and one that survives the holiday party gauntlet. Don’t skip this. IMO, a quick-dry top coat is the best invention since sliced bread.
- Your Base Color Polish: This is your canvas! Classic red, hunter green, shimmery gold, or a simple nude or white. The world is your oyster.
- A Fine Detailing Brush: This is your magic wand. You can buy a dedicated nail art brush set for pennies online. If you’re in a pinch, a toothpick can work for dots, but a brush gives you so much more control.
- Dotting Tools: Again, super cheap and perfect for creating perfect, uniform berries.
The Color Palette:
- Green: A forest or emerald green is perfect for the leaves.
- Red: A classic, bright Christmas red for the berries.
- White or Gold: For highlights, veins in the leaves, or a touch of extra sparkle.
Got your gear ready? Fantastic. Let’s get to the fun part.
15 Festive Christmas Holly Nail Designs You’ll Love
1. The Classic Crimson & Green

This is your starting point. The little black dress of holly nail art.
- How to: Paint your nails a rich, creamy red. Using your detailing brush and green polish, paint two simple, slightly curved teardrop shapes next to each other to form a leaf. Add three small red dots (using your dotting tool) at the base. Easy, right?
- Pro Tip: Add a tiny dash of white or gold on each leaf for a highlight. It instantly makes your design look more professional.
2. Minimalist Berry Accent

For my friends who believe less is more. This is subtle, chic, and oh-so-effective.
- How to: Paint your nails a soft nude, blush pink, or even a clear, glossy coat. On a single nail (your ring finger is the classic choice), paint a single, small holly sprig in the corner.
- Why it Works: It’s a whisper of festivity. It says, “I’m celebrating, but I’m also very, very cool.” 🙂
3. Glitter Gradient with Holly

Because what’s Christmas without a little sparkle? This design combines the best of both worlds.
- How to: Start with a deep green or red base. Using a makeup sponge, dab a glitter polish (gold or silver is perfect) onto the tips of your nails, creating a gradient effect. Once that’s dry, add your holly design over the glittery part on one or two accent nails.
- Personal Anebrute: I always make a mess with glitter, but the final look is so worth it. Just do your manicure over an old magazine to catch the fallout!
4. French Tip Holly Twist
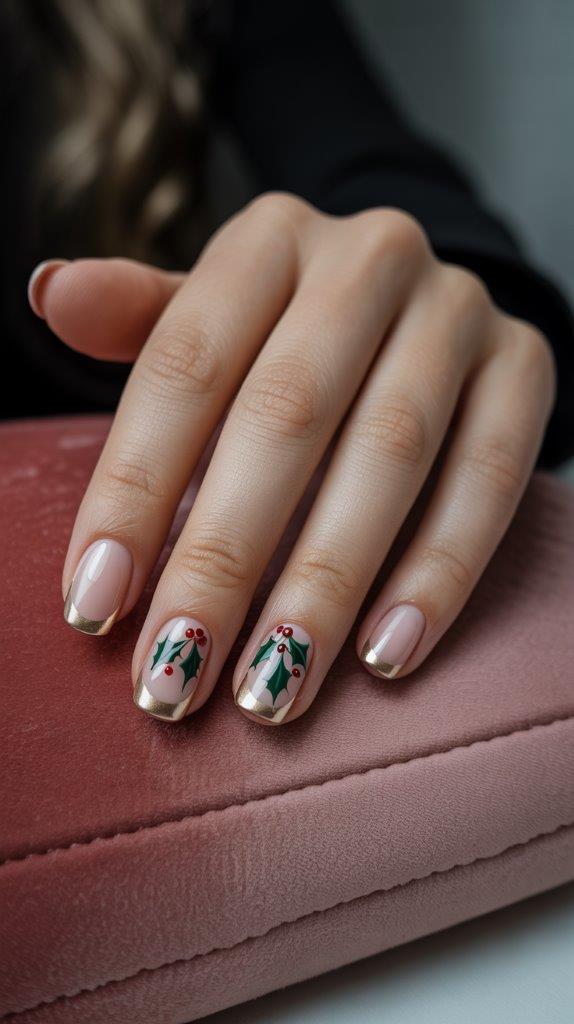
Upgrade the classic French manicure for the holidays. It’s like your nails are wearing a festive tuxedo.
- How to: Instead of a white tip, paint a thin stripe of gold or red. Then, using your detailing brush, paint tiny holly leaves and berries along the line where the tip meets the nail bed.
- Pro Tip: This looks especially stunning on shorter, well-manicured nails.
5. Matte Holly Magic

Matte nails have a super chic, velvety look that is just gorgeous for the holidays.
- How to: Paint your nails a classic color—I love a deep burgundy or forest green for this. Once it’s completely dry, seal it with a matte top coat. Then, using glossy polish, paint your holly design on top. The contrast between the matte background and the glossy holly is absolutely divine.
6. Holly Jolly Glitter Bomb

For when subtlety goes out the window and you just want to lean all the way into the festive spirit.
- How to: Paint your nails with a full-coverage glitter polish. We’re talking red, green, or gold glitter. Then, paint your holly design on top in a solid, non-glittery color to make it pop. It’s bold, it’s beautiful, and it will catch the light from every possible angle.
7. Negative Space Holly


This is a modern, artistic take that always gets compliments.
- How to: Leave a portion of your natural nail bare (the negative space) and paint the rest a solid color. Then, place your holly design so it straddles the painted and unpainted sections. For example, you could have a diagonal split, with holly leaves crossing the line.
- Why it Works: It breaks up the solid color and feels fresh and contemporary.
8. The “Ugly Sweater” Nail
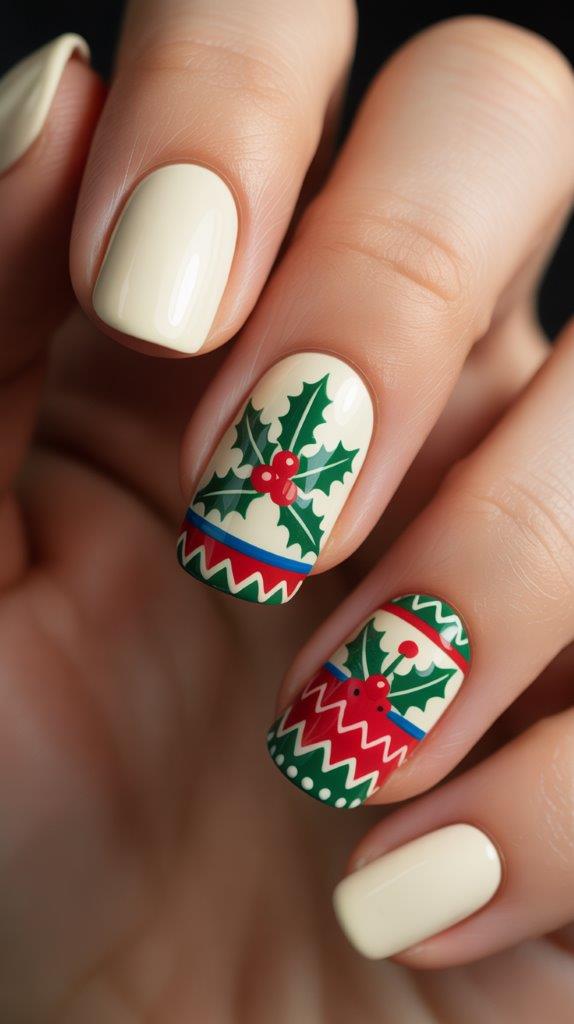
Embrace the chaos! This design is fun, playful, and packed with personality.
- How to: Choose a busy, festive base. Think a cable knit pattern, a colorful fair isle print, or even just a bunch of mixed-up Christmas colors. Then, add your holly sprig on top. It should look like one element of a wonderfully cluttered holiday scene.
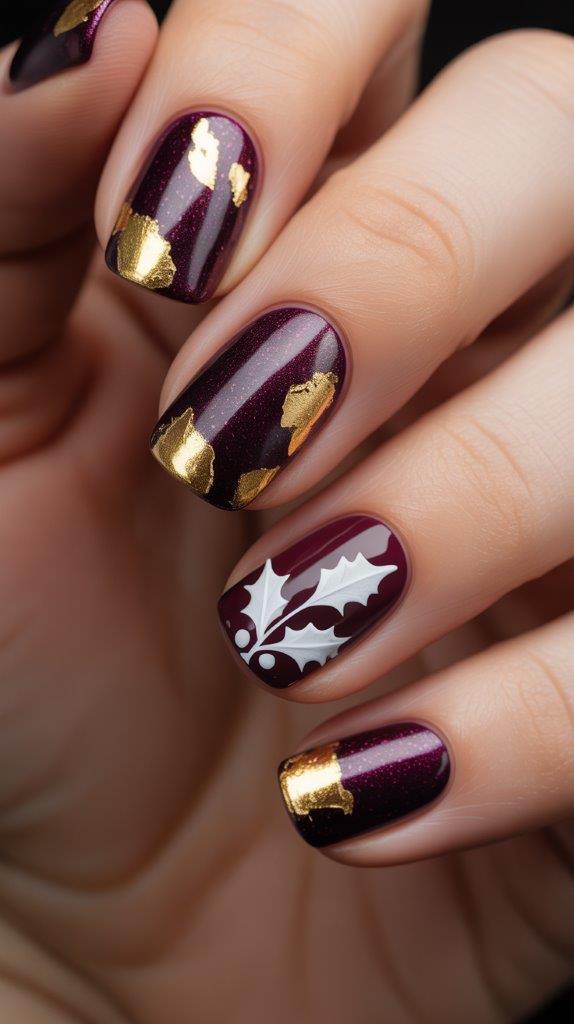
9. Gold Foil Elegance
Want to feel like royalty at your holiday gathering? This is the design for you.
- How to: Paint your nails a deep, jewel-toned color like navy blue or plum. Once your base color is tacky, gently press small pieces of gold leaf or gold foil transfer onto the nail. Seal it with a top coat, then add a simple, elegant holly design in white or the same deep base color.
10. Holly Over Ombre

Ombre might seem intimidating, but with a sponge, it’s surprisingly simple.
- How to: Sponge on a gradient of two complementary colors—red to pink, green to gold, etc. Once that masterpiece is dry, add a holly sprig right in the center where the colors blend. It creates a beautiful, ethereal background for your festive art.
11. The Single Berry Statement

Sometimes, you don’t even need the leaves. This is the ultimate in minimalist festive flair.
- How to: On a neutral or solid-colored base, use your dotting tool to create a single, perfect red berry on each nail. Then, using your thinnest brush, add two tiny, delicate leaves coming off the side. It’s understated, chic, and ridiculously easy.
12. Stamped for Perfection

Okay, I hear you. “But I have zero artistic ability!” No worries. Nail stamping is here to save the day.
- How to: Invest in a holiday-themed nail stamping plate that has a holly design. You simply scrape polish over the etched design, pick it up with a silicone stamper, and transfer it perfectly onto your nail. It’s literally a 10-second process per nail and looks flawless every single time. FYI, this is my secret weapon when I’m short on time.
13. Watercolor Holly

This technique creates a soft, dreamy, and beautifully unique look.
- How to: Start with a white base coat. While your polish is still slightly wet, use a small brush to dab on a light green polish and let it bleed and spread slightly, creating a watercolor effect. Once that’s dry, define your holly leaves and berries with a more precise line on top.
14. Holly Side Saddle

Who says your design has to be in the center? This one adds a cool, geometric feel.
- How to: Paint a vertical stripe of gold or red along one side of your nail. Then, have your holly leaves and berries “crawl” up that stripe. It elongates the nail and feels very fashion-forward.
15. The Full-Blown Holly Bush

You’ve seen the single sprig. Now, let’s talk about the entire bush. This is for the maximalists, the “more is more” crowd.
- How to: Cover your entire nail with a tapestry of holly leaves and berries. Vary the shades of green and red for depth. It’s a statement. It’s a commitment. And it is utterly, breathtakingly festive.
How to Make Your Holly Mani Last Through the Festive Frenzy
You’ve created a masterpiece. Now, let’s protect it.
- Wrap Your Tips: When applying your top coat, drag the brush slightly over the edge of your nail and under the tip. This “wraps” the polish and prevents premature chipping.
- Reapply Your Top Coat: Every 2-3 days, add a fresh layer of top coat. This replenishes the shine and adds a new protective shield.
- Gloves Are Your Friend: Washing dishes? Cleaning up after the holiday feast? Wear gloves. Hot water and harsh chemicals are a manicure’s worst enemy.
Your Turn to Create!
So, there you have it. Fifteen ways to deck your nails out in the most festive of flora. From the minimalist single berry to the full-on glitter bomb, there’s a holly design here for every personality and skill level.
The best part? There are no rules. Mix and match these ideas. Do a glitter gradient on your ring fingers and minimalist holly on the rest. Experiment. Play. Have fun with it. After all, that’s what the holidays are all about, right?
Now, I have to know which design are you trying first? Go on, get painting, and get ready to show off those festive fingertips. You’ve totally got this!
Leave a Reply
You must be logged in to post a comment.