Hey there, nail-art buddy! If you’ve ever stared at your plain manicure and thought, “It needs sparkle, but also vibes,” then you’re in the perfect place. Today, we’re diving deep into Christmas light nails—yes, those twinkly, glow-inspired designs that make your fingers feel like holiday fairy lights. 🎄✨
I’ve tried many seasonal manicure trends over the years (some great, some… let’s just say “learning experiences”), and I’m thrilled to share 27 festive Christmas light nail ideas that stand out, delight, and bring on the holiday cheer. Ready? Let’s glow.
Why Christmas Light Nails Are the Ultimate Holiday Manicure
They instantly scream festive (in the chicest way)
Want your nails to double as mini holiday decorations? Christmas light nails do that. They’re bold, playful, and inject personality into your look.
Fun to customize
Want subtle glimmers or full-on blinking vibes? You decide the intensity. You can go delicate, dramatic, or somewhere in between.
Great conversation starter
People will stop and ask, “Wait—are those nails glowing?!” That’s your cue to smile, drop your manicure secrets, and bask in compliments.
What You’ll Need to Make Christmas Light Nails (Your DIY Kit)
Here’s what I always have on hand (because yes, I love doing my own nails):
- Base coat (protects your real nails)
- Nude, white, or light-colored polish (serves as backdrop)
- Colored polishes (red, green, gold, blue—you name it)
- Thin striping brush or dotting tool (for wires, little bulbs)
- Glitter or shimmer topcoat (for extra “light sparkle”)
- Clear gel or topcoat (regular or UV, depending on your system)
- Optional: Tiny rhinestones or micro-beads (for bulb “glow”)
- Optional: Glow-in-the-dark polish (for nighttime wow)
Quick tip: Work one nail at a time when doing the wire + bulbs so the polish doesn’t dry mid-design and mess you up.
27 Festive Christmas Light Nail Ideas That Glow
Alright, time for the fun part — the inspo list! Here are 27 Christmas light nail designs that’ll have your hands stealing the show this holiday season. Whether you’re a “subtle shimmer” kind of person or a “deck-the-halls-with-glitter” type, there’s something here for every mood (and manicure skill level 😉).
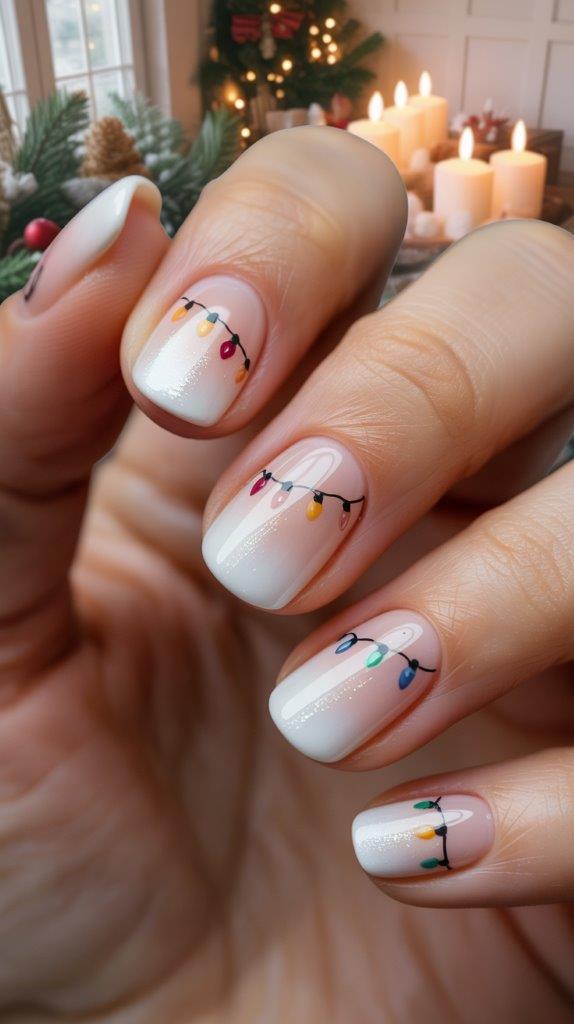
1. Classic String of Lights

The OG of the trend. Paint little wavy green or black “wires” across your nails, then dot colorful bulbs along them. It’s playful, bright, and instantly festive.
2. Glowing Bulbs Only

Skip the wire and just dot tiny glowing bulbs across a nude or light base. It’s minimalist and so easy to do — perfect if you love the look without the fuss.
3. Two-Fingertip Showstopper

Keep most of your nails simple, but go all-out with a light string design on just two accent fingers. It’s like wearing statement jewelry, but for your hands.
4. Glow-in-the-Dark Lights

This one’s so fun. Use glow-in-the-dark polish for the bulbs — they’ll actually glow when the lights go down. It’s like carrying your own mini holiday light show.
5. Line Art Lights

Go for crisp, white wire lines and tiny monochrome bulbs on a sheer pink or beige base. It’s artsy and understated, like a minimalist Christmas card.
6. Candy Cane Wires

Add a twist by painting your wire in red and white stripes. It’s festive, cheeky, and screams “I love Christmas, unapologetically.”
7. Snow and Lights Combo

Paint a few snowflakes or tiny white dots around your bulbs for a frosty, magical winter vibe. You’ll basically be wearing a snow globe on your fingers.
8. Rhinestone Bulbs

Swap painted bulbs for tiny rhinestones or beads. They catch light beautifully and make your nails look like actual glowing bulbs — perfect for parties!
9. Gradient Background
Try a soft gradient or ombré base before adding your light string. A pastel fade or even a twilight sky tone can make your design pop.
10. Gradient Bulbs

Instead of using solid colors, let each bulb fade from one color to another. Think blue to teal, pink to gold — it’s artsy and unexpectedly elegant.
11. Festive Words + Lights

Paint small festive words like “JOY,” “NOEL,” or “MERRY” across your nails and weave the light string around them. It’s personalized and oh-so-cute.
12. French Tip with Lights

Classic French tip, but make it Christmas. Paint the wire along your nail tips and dot bulbs across it. Elegant yet festive — the best of both worlds.
13. Negative Space Lights
Leave parts of your nail bare and paint your light strings directly over the natural nail. It’s modern, edgy, and super chic.
14. Metallic Wires and Bulbs

Swap your regular polish for metallics — gold or silver wires paired with shiny bulbs add instant glamour. Perfect for holiday dinners or NYE.
15. Glitter-Filled Bulbs

Want to turn up the sparkle? Fill your bulb shapes with micro-glitter. The shimmer catches every bit of light — it’s like jewelry in polish form.
16. Pastel Christmas Lights

Go soft with pastel blues, pinks, and yellows instead of the traditional red and green. It’s a fresh, dreamy take on a classic theme.
17. Matte Background, Shiny Bulbs

This contrast is pure magic. A matte nude or black background makes the glossy bulbs stand out even more. Think cozy-chic meets glam.
18. Striped Bulbs

Give each bulb its own mini personality with stripes or polka dots. It’s playful and a great way to show off your creativity.
19. Mini Garland Lights

Instead of stringing lights across the whole nail, wrap them around one or two nails like a little garland. Adorable and elegant at the same time.
20. Diagonal Light Lines

Change things up by painting your light string diagonally across each nail. It gives a dynamic, more flowing look to the whole set.
21. Corner Light Clusters

If you’re into subtlety, cluster a few bulbs in one corner of each nail instead of full strings. It’s minimalist with just the right amount of festive sparkle.
22. Half-Light Nails

Keep one half of the nail bare or a solid color and decorate the other half with your string of lights. It’s an eye-catching twist on the trend.
23. Hanging Bulbs

Paint just the ends of your wires so the bulbs hang down slightly — like mini ornaments on your fingertips. It’s delicate, different, and super cute.
24. One Accent Nail Party

Keep most nails plain and go all out on one accent nail — full lights, sparkle, and color. It’s low-effort, high-impact.
25. Candy-Colored Lights

Use candy-inspired shades like mint green, bubblegum pink, or icy blue. Sweet, bright, and totally unexpected for Christmas.
26. Black Base with Neon Lights

This one’s bold! Use a black base and paint bright neon bulbs — the contrast makes it look like actual electric lights. It’s modern and perfect for a night out.
27. Mixed Media Lights

Can’t decide? Combine them all! Paint, glitter, rhinestones, decals — mix textures for a “more is more” festive masterpiece. Because hey, it’s Christmas!
Pro tip: Start practicing on a nail wheel or press-on nails before you commit to your hands. I messed up more times than I’d like to admit.
Step-by-Step: How I Created My “Glowing String” Christmas Light Nail
I want to share exactly how I made one of my favorites—so you can replicate or tweak as you like.
- Prep everything. File, buff, clean—go through your usual manicure routine.
- Apply base coat + base color. I used a soft cream base so colors would pop.
- Draw your wire lines. I used a thin striping brush and a deep green polish. Start at one side, wiggle gently across.
- Dot bulbs. I filled with red, gold, and blue. I placed small dots along the wire—spacing matters.
- Add light “glow.” I lightly dabbed a hemispherical dot of translucent white or shimmer around each bulb to mimic halo.
- Optional accents. I threw on micro-glitter around some bulbs and one rhinestone bulb for drama.
- Topcoat everything. Thick clear gel or topcoat to seal in. Voilà—my nails now look like they’re hosting their own little holiday party.
That’s how I did it, and I love how I can catch light glints as I move my hands. (Yes, I admire my nails in every reflective surface.)
Tips & Tricks to Nail (Pun Intended) Christmas Light Nail Designs
Plan your layout
Before applying polish, sketch (even lightly) where wires will flow. Decide which nails get more detail vs which stay simpler.
Use quality tools
Thin brushes, good polishes (no dragging or streaking), and reliable topcoats make the difference between wow and eh.
Don’t overdo it
Yes, “festive” is great, but too many lights or clashing colors can look chaotic. Let negative space breathe.
Let layers dry
Patience is key. Let your wire layer dry before adding bulbs. Let bulbs dry before shading or topcoating.
Fix mistakes with a toothpick
I’ve saved many “oops” moments by gently scratching off stray dots or lines with a damp toothpick or fine brush before it fully cures.
Get comfortable lighting
Use a daylight lamp or bright white light so you see colors properly. Under yellow lights, your red might look off.
What About Doing This at a Salon? How to Communicate
If DIY isn’t your jam or you’re short on time, take this cheat sheet to your nail tech:
- Show them a few reference photos.
- Ask for thin wires, colorful dots as bulbs, and maybe a shimmer/glow effect.
- Mention whether you want glow-in-the-dark or 3D rhinestones.
- Request a strong topcoat or gel overlay—you’re going to move, decorate, snack, etc.
A good tech will love the challenge. If they hesitate—well, that’s where your inner nail artist might emerge (or you find a more adventurous tech 😊).
What Styles Work Best with Christmas Light Nails
Not all nail shapes or base styles carry Christmas light designs the same. Here’s a quick cheat list of what to pair:
- Short squoval or almond: Great for minimalist or accent styles (Idea #2, #8, #12).
- Long coffin/almond: Perfect canvas for full strings, diagonal wires, garlands (Ideas #1, #19, #26).
- Soft square: Works well with clustered bulbs or half-nail designs (Ideas #21, #24).
- Rounded nails: Good for delicate line art, negative space styles (Ideas #5, #13).
Also, base colors matter. Light or nude bases make bulbs pop; dark bases can dramatize neon styles. Choose based on your vibe.
Troubleshooting & Common Mistakes
Believe me, I’ve made these mistakes so you don’t have to. Here’s how to dodge them:
| Problem | Likely Cause | Fix / Prevention |
|---|---|---|
| Wire lines look wobbly | Brush too thick or too much polish on brush | Wipe excess off brush, use a finer tool |
| Bulb dots blotchy or uneven | Too much polish or inconsistent pressure | Use a dotting tool and same amount each time |
| Colors bleed into wire | Layers weren’t dry | Wait patiently between layers |
| Topcoat smudges detail | Not cured or premature topcoat | Cure or dry fully before topcoating |
| Design chips quickly | Weak topcoat or no sealing | Use strong gel or multiple clear layers |
If something starts to smudge, don’t panic! Fix immediately with a clean brush dipped in remover or base coat. I’ve rescued many a “ruined” nail that way.
How to Transition to Post-Holiday (“Now What?”)
You’ll eventually want your nails to chill out post-December. Here’s how you can ease the transition (without ripping everything off in frustration):
- Fade out the lights: Replace bulbs with neutral dots or just a glitter fade.
- Cover with a neutral topcoat or sheer polish to tone down the brightness.
- Use one accent nail with lights and make the rest minimal.
- Gradually switch to holiday neutrals—like a soft gold or champagne background.
That way your mani doesn’t scream “December only” for months after.
Wrapping Up the Christmas Light Nail Magic
If you’ve made it here, you’re basically a Christmas light nail scholar. Quick recap:
- You can create mesmerizing Christmas light nails by combining wires, colored bulbs, glows, and optional accents.
- You have 27 fresh ideas—from subtle minimal to full-blown sparkle.
- Use good tools, layer wisely, and plan your layout to stay in control.
- Whether DIY or salon-bound, you have the vocabulary and vision to get what you want.
- Transitioning out after the holidays? Slow fade or accent tweaks work wonders.
I can’t wait to see which design you try first (or the tenth 😂). Go ahead, pick your favorite from the list, channel your inner sparkle, and let your nails glow like holiday magic.
Pro challenge: Try Idea #4 (Glow-in-the-Dark Lights) on one hand and #12 (French Tip + Lights) on the other. Send me a picture (if you feel brave) so I can ooh and aah properly.
Happy painting, glowing, and holiday-nail flexing! 🎅✨
Leave a Reply
You must be logged in to post a comment.