
Spring is finally peeking through the clouds, and honestly, my mood is lifting along with the temperature. I recently looked down at my chipped, dark winter polish and realized I needed a serious seasonal intervention. If you also prefer keeping your nails short for the sake of typing, gardening, or just basic sanity, you probably struggle to find holiday designs that actually fit on a smaller canvas.
I’ve spent way too many hours scrolling through Instagram only to find “simple” designs that require three inches of acrylic to work. Let’s be real: most of us just want something festive that doesn’t take three hours or require the steady hand of a neurosurgeon. I gathered 19 Cute & Easy Easter Nails for Short Nails (Simple Spring Manicures) that you can actually finish before your coffee gets cold.
Are you ready to stop paying $80 at the salon and start your own DIY nail era? I promise these designs look professional without the professional price tag. Let’s get those short nails looking like a spring masterpiece.
1. The Classic Robin’s Egg Speckle
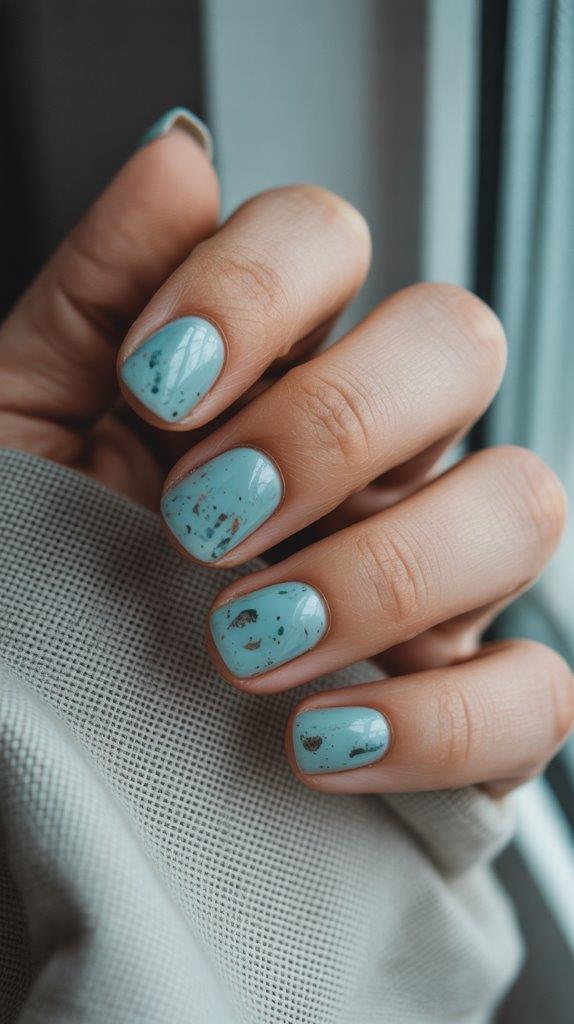
This design is the ultimate “low effort, high reward” manicure for the Easter season. I love this look because it hides any tiny mistakes you might make with your base coat. Start with a soft turquoise or baby blue base polish and let it dry completely.
To get the speckled effect, you don’t need fancy equipment. Dip an old toothbrush or a fan brush into a tiny bit of black or dark brown polish. Flick the bristles over your nails to create random, organic spots that mimic a real bird’s egg. It looks intentional, artistic, and perfectly messy.
2. Minimalist Bunny Ear Accents

You don’t need to paint a whole rabbit to get the point across. In fact, trying to paint a full bunny on short nails often leads to a blob that looks more like a confused potato. Stick to the ears!
Paint your nails a sheer nude or a soft blush pink. Use a white polish and a toothpick to draw two long, thin ovals at the tip of your ring finger. Add a tiny dot of pink inside the white for the “inner ear.” This minimalist approach keeps your short nails looking clean and sophisticated rather than cluttered.
3. Pastel Skittles Manicure

If you can paint your nails a solid color, you can do this. The “Skittle” mani simply means you paint each finger a different shade from the same color family. For Easter, I recommend a palette of mint, lavender, pale yellow, baby blue, and peach.
This style works perfectly for short nails because it doesn’t require any vertical space for art. It turns your hand into a literal basket of Easter eggs. Use a matte top coat to give it a modern, velvety finish that feels very “Pinterest-worthy.”
4. Dainty Daisy Dots

Floral patterns can feel intimidating, but daisies are just a collection of dots. I’ve found that short nails look best when you keep the flowers small and scattered. Use a bobby pin or a dotting tool to create five white dots in a circle.
Place a single yellow dot in the center once the white is dry. I usually put two or three of these on my thumb and leave the rest of the nails a solid spring green. Does it get any easier than that? It gives off a “secret garden” vibe with almost zero effort.
5. The “Peeps” Inspired Palette

We all have a love-hate relationship with those sugar-coated marshmallow chicks, right? Whether you eat them or not, their colors are iconic for the season. I suggest picking your favorite Peep color—electric yellow or neon pink—and going all in.
Paint your short nails that one bold color and finish with a clear glitter topper. The glitter mimics the sugar coating of the candy. It is a fun, nostalgic look that pops against any Easter outfit. FYI, this is my go-to when I’m in a rush but still want to look festive.
6. Micro-Carrot Accents
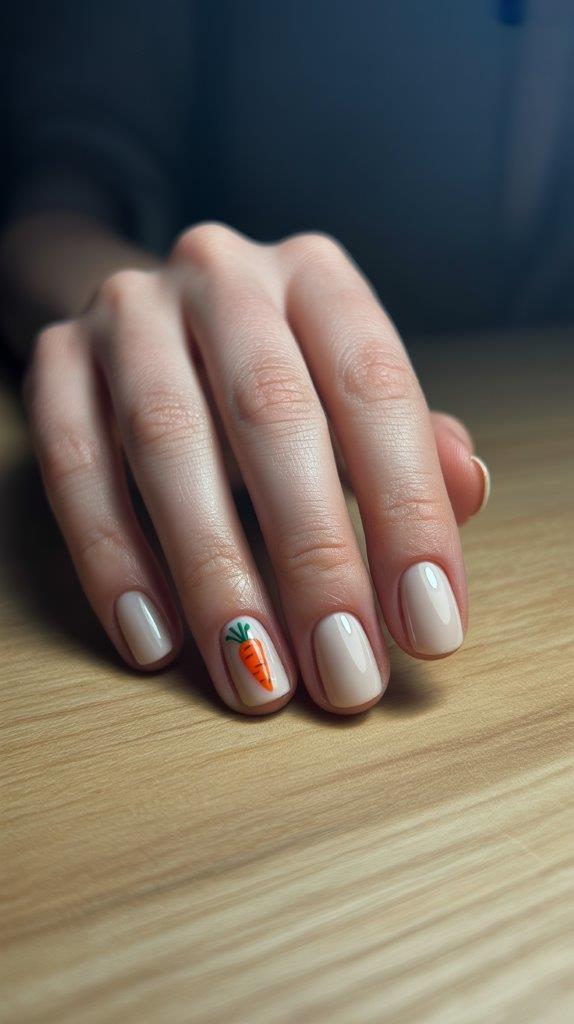
Carrots are the perfect shape for short nails because they are naturally squat and cute. Paint your nails a crisp white or a light cream to serve as your canvas. Use an orange polish to draw a small, downward-pointing triangle on your ring finger.
Add two tiny green lines at the top for the stems. I like to add a few horizontal brown “cracks” on the orange part to make it look more realistic. It’s a quirky accent that always starts a conversation at brunch.
7. Soft Lavender Ombre

Ombre isn’t just for long nails; you just have to change your technique. Instead of a vertical fade, try a horizontal ombre across your whole hand. Paint your thumb a deep lilac and gradually get lighter on each finger until your pinky is a pale, off-white lavender.
This creates a beautiful, cohesive look that elongates the appearance of short fingers. Always use a high-gloss top coat to blend the colors together visually. It looks like you spent a lot of time planning, even though you just used five different bottles of polish.
8. Metallic Gold Egg Wraps
If you want something a bit more “adult,” look toward the metallic wrappers on fancy chocolate eggs. Paint your nails a muted sage green or a dusty rose. While the polish is still slightly tacky, dab on a few flecks of gold leaf.
You can find gold leaf at any craft store for a few dollars. It gives the nails a high-end, textured look that feels very luxe. It is a great way to participate in the holiday without feeling like you’re wearing a children’s craft project.
9. Yellow Chick Half-Moons

The “half-moon” at the base of your nail is the perfect spot for a little Easter chick. Paint your nails a sheer nude first. Then, draw a bright yellow semi-circle at the very base of your nail, near the cuticle.
Add two tiny black dots for eyes and a microscopic orange triangle for a beak. Since the art is at the base, it doesn’t matter how short your nails are. This design grows out beautifully, meaning you won’t have to redo it for at least two weeks.
10. Abstract Spring Swirls

Abstract art is a lifesaver for those of us with shaky hands. You don’t have to be precise, which is the whole point. Grab three colors—like sky blue, white, and coral.
Use a thin brush to paint wavy lines across your nails in various directions. Let the colors overlap and intersect. The imperfection makes it look “gallery chic” rather than messy. Ever wondered why this works so well? It’s because your eye focuses on the movement of the lines rather than the length of the nail.
11. Gingham Picnic Pattern

Nothing says “spring is here” like a gingham print. While it looks complicated, you can cheat by using a nail stamping kit or thin striping tape. I prefer a light blue and white combo.
Create a grid of thin lines over a white base. Where the blue lines intersect, the color should be slightly darker. This creates that classic picnic blanket aesthetic. Bold the lines on just one finger if you think the full hand is too busy for your short nails.
12. Cloudy Sky Tips

Why do a boring French tip when you can paint the sky? Paint your nails a soft “Cinderella” blue. Instead of a straight line at the tip, use a white polish to create three or four overlapping dots.
These dots create a fluffy cloud effect at the edge of your nail. It’s a whimsical take on a classic style that looks amazing on shorter lengths. It also helps hide any unevenness in your natural nail shape.
13. Sparkling Jelly Nails

Jelly nails are translucent, colorful, and look exactly like gummy jelly beans. I recommend finding a sheer purple or pink polish. Apply three thin coats to build up a “squishy” look.
Add a layer of holographic glitter in the middle for some depth. This design is incredibly forgiving because the sheer color doesn’t show chips as easily as opaque polish. IMO, this is the most “Easter” look on this list because it literally looks like candy. 🙂
14. Polka Dot Parade

If you are a total beginner, polka dots are your best friend. They are consistent, easy, and undeniably cute. Use a white base and place multi-colored pastel dots all over the nail.
I like to use a toothpick to keep the dots tiny and refined. If you want a more modern look, only place the dots along one side of the nail. This asymmetrical design makes short nails look longer and more intentional.
15. Negative Space Petals

Negative space designs use your natural nail color as part of the art. This is great for short nails because it prevents the design from feeling “heavy.” Paint tiny colorful petals around the edges of your nails, leaving the center bare.
Seal it with a clear, high-shine top coat. This looks incredibly fresh and clean. It’s also very practical because chips are almost invisible against the clear center of the nail.
16. Matte Mint and Gold

Mint green is the unofficial color of Easter. However, I find that a shiny mint can look a bit “dated.” Swap your regular top coat for a matte finish to instantly modernize the color.
Add a single gold stud or a tiny gold dot at the base of each nail. This creates a minimalist, high-fashion look that works for both Easter dinner and your Monday morning meetings. Simplicity is key when you’re working with less surface area.
17. Pressed Flower Stickers

Let’s be honest: sometimes we just don’t have the time to paint tiny details. That is why I keep a pack of nail stickers or water decals in my drawer. You can find beautiful, realistic designs of tiny pressed flowers.
Apply a sheer base, stick the flower on, and cover it with a thick top coat. It looks like you spent hours on a hand-painted botanical masterpiece. No one needs to know you did it in five minutes while watching TV.
18. Vertical Pastel Stripes

If you want to trick the eye into thinking your nails are longer, use vertical lines. Paint your nails a creamy off-white. Use a striping brush to draw three very thin, vertical lines in different pastels—like pink, yellow, and green.
The vertical orientation draws the eye upward, creating the illusion of length. Make sure your lines are as thin as possible; thick lines can make short nails look wider. This design feels very preppy and sophisticated.
19. The “Golden Egg” Shimmer
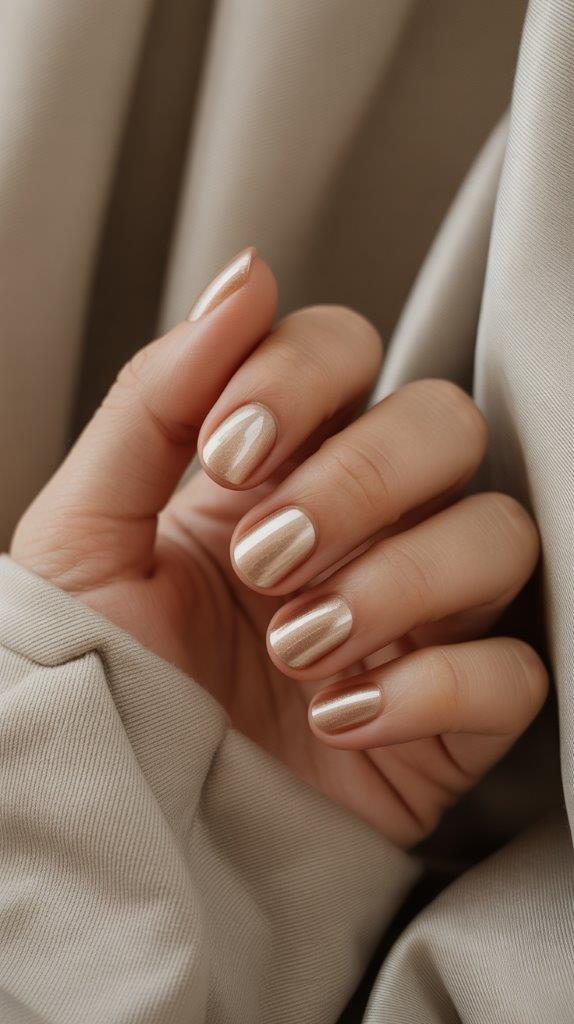
Every Easter hunt has that one special golden egg. Why not let that be your manicure? Find a champagne-colored shimmer polish that isn’t quite gold but isn’t quite silver.
Apply two coats for a full, luminous finish. This color reflects light beautifully and makes your hands look tanned and healthy. It is the ultimate “lazy girl” Easter nail because it goes with everything and takes seconds to apply.
Essential Tools for Your DIY Easter Mani
Before you start painting, you need a solid setup. I used to think I needed a professional kit, but you can find most of these things in your bathroom cabinet.
- Toothpicks or Bobby Pins: These are perfect for creating dots and small details like bunny eyes.
- Makeup Sponges: Use these for the easiest ombre effect you’ve ever seen.
- High-Quality Top Coat: This is non-negotiable. It protects your art and hides the “home-made” texture.
- Clean-up Brush: Dip a small, flat brush in acetone to wipe away any polish that gets on your skin.
Investing in a strengthening base coat also helps. Short nails are prone to peeling, and a good base keeps your manicure from popping off after just one day of egg hunting.
How to Make Your Manicure Last
Nothing is worse than spending an hour on your nails only for them to chip while you’re prepaing the Easter ham. I’ve learned a few tricks over the years to keep my short manis looking fresh.
Always cap the free edge of your nail with polish. This means running the brush along the very tip of your nail to “seal” it. Since short nails constantly hit things (like your keyboard), this extra bit of polish acts as a bumper.
Avoid using your nails as tools! I know it’s tempting to use them to peel off stickers or open soda cans, but that is the fastest way to ruin your hard work. Use your finger pads or a real tool instead.
Choosing the Right Spring Colors
When you’re shopping for polish, look for “cream” finishes. These are opaque and solid, which provides a much better background for nail art than “frosty” or “sheer” finishes.
Stick to a consistent color story. If you pick a “cool” lavender, stay with “cool” blues and greens. Mixing warm and cool tones can sometimes make a manicure look muddy. I personally love the Essie spring collections because they always nail that “Easter egg” vibe perfectly.
Why Short Nails are Better for DIY
I genuinely believe short nails are the superior choice for home manicures. You have less surface area to mess up, and the designs look inherently “cuter” when they are compact.
Plus, short nails are much healthier for your natural nail bed. You don’t have to worry about the painful “snaps” that come with long acrylics. You can be as festive as you want while still being able to button your own coat. It’s a win for everyone involved.
Final Thoughts on Your Easter Nails
At the end of the day, your Easter manicure should make you smile when you look at your hands. Don’t worry if your “bunny” has one ear slightly longer than the other. Most people won’t be looking at your nails with a magnifying glass; they’ll just see the effort and the festive colors.
Spring is a time for new beginnings, so let this be the season you finally master the at-home manicure. Grab a glass of lemonade, put on some music, and start experimenting with these 19 Cute & Easy Easter Nails for Short Nails (Simple Spring Manicures).
If all else fails, remember that a messy “speckled egg” design is actually trendy. You literally cannot fail with that one. Leave the stress at the salon and enjoy the process of creating something yourself. I can’t wait to see which design you choose for your Sunday brunch! 🙂
Leave a Reply
You must be logged in to post a comment.