

Let’s be honest for a second. We’ve all spent way too much money at the salon only to walk out with nails that look nothing like the inspiration photo. I once asked for a “subtle bunny” and left with something that looked like a very startled white cat. That experience taught me one thing: I need to take matters into my own hands—literally.
With spring finally showing its face, it’s time to retire those moody winter plums and embrace the pastel chaos. Whether you want something sophisticated for Easter brunch or a design that makes your kids giggle, I’ve got you covered. Here are 27 Easter themed nail designs that are absolutely egg-cellent and actually possible to achieve at home or with a pro.
Ever wondered why we wait all year for these specific colors? There’s just something about a fresh lavender or a mint green that resets the brain. Let’s look at the best ways to deck out your fingertips this season.
Minimalist & Classy Easter Looks
You don’t always need a full-blown mural on your nails to celebrate the holiday. Sometimes, less truly provides more impact, especially if you work in a corporate setting. These designs keep things professional while still nodding to the spring vibes.
1. The Classic Pastel Skittle

I recommend this to everyone who lacks the patience for intricate art. You simply pick five different pastel shades and paint one on each finger. I usually go with mint, lavender, pale yellow, baby blue, and peach. It looks incredibly intentional and takes about ten minutes to finish.
2. Milky White with a Single Pearl

I love the “clean girl” aesthetic for spring. Paint your nails a sheer, milky white and place a single tiny pearl at the base of your ring finger. It looks expensive, sophisticated, and perfectly mimics the shimmer of a high-end Easter egg.
3. Micro-French Pastel Tips

Thick French tips feel a bit dated, but the micro-French is having a massive moment. Use a very thin detailing brush to sweep a pastel color across the very edge of your nail. It elongates your fingers and adds just enough color to notice without being overwhelming.
4. Negative Space Half-Moons

Leave the base of your nail bare and paint the rest a vibrant coral or soft teal. This “half-moon” style grows out beautifully. Bold the contrast by adding a tiny gold dot where the color meets the natural nail.
5. Matte Sage Green

Sage green basically acts as a neutral in the spring. I suggest applying a matte top coat over a solid sage polish. It creates a velvet-like texture that feels modern and high-fashion.
6. Sheer Nude with “Hidden” Shimmer

If you prefer a natural look, choose a nude polish that matches your skin tone perfectly. Look for a brand that includes microscopic iridescent shimmer within the formula. It only catches the light when you move your hands, giving off a “magical” vibe.
7. Champagne Metallic Solids

Gold can feel a bit heavy for spring, so I opt for champagne. It has a cooler undertone that pairs beautifully with floral dresses. Use a high-shine metallic polish for a sleek, mirror-like finish that stands out at any Easter party.
Character & Critter Vibes
If you can’t have a little fun with bunnies and chicks during Easter, when can you? These designs require a bit more focus, but the payoff is worth the extra effort. IMO, these are the real showstoppers of the holiday.
8. Minimalist Bunny Ears

You don’t need to paint a whole rabbit face to get the point across. I usually paint my nails a sheer pink and then draw two long white ovals at the tip of my ring finger. Add a tiny pink dot inside each oval for the “inner ear” and you’re done.
9. Peeking Yellow Chicks

Paint the bottom half of your nail a bright, sunny yellow. Add two tiny black dots for eyes and a small orange triangle for a beak. It looks like a chick is peeking over a fence, and it’s much easier than trying to paint a perfect circle.
10. Tiny Carrot Accents

I find carrots to be the easiest food to paint on a nail. Draw a long, thin orange triangle pointing toward your cuticle. Use a toothpick to add a few green squiggles at the top for the stems.
11. Robin’s Egg Speckle

This is my absolute favorite DIY technique. Paint your nails a soft turquoise blue and let it dry. Dip an old toothbrush into black polish and flick the bristles over your nails to create random speckles. It hides any imperfections in your base coat perfectly.
12. Butterfly Wing Tips

Spring brings butterflies, so why not put them on your nails? Use a sponge to create a gradient from pink to orange at the tips. Then, use a fine black liner to draw the delicate “veins” of a wing.
13. Ladybug Polka Dots

Red can be an Easter color if you do it right. Paint your nails a soft white and add a single red ladybug on your thumb. It’s a classic spring symbol that feels fresh and playful.
14. Lamb-Inspired Texture

Use a white “sugar” or textured polish to create a fluffy lamb look. You paint a white semi-circle and add two little black dots for eyes. The textured polish mimics the wool perfectly without you needing to do much work.
Abstract & Artistic Spring Patterns
Abstract art is the best friend of anyone with a shaky hand. These designs don’t rely on symmetry or perfection, which makes them perfect for a relaxing DIY session.
15. Pastel Watercolor Marble

You can achieve this look by dropping a few colors onto a piece of plastic wrap and swirling them together. Press your nail into the swirl to pick up the pattern. Every nail will look unique, just like a hand-dyed Easter egg.
16. Abstract Swirls

Use a thin brush to draw wavy, loopy lines across your nails in various spring colors. Don’t worry about where they go—the messier, the better. It looks like something you’d see in a high-end art gallery.
17. Gingham Picnic Print

Gingham always feels like an Easter picnic. Paint a white base and then draw intersecting lines of light blue. Where the lines cross, add a tiny bit more color to mimic the layered fabric look.
18. Vertical Rainbow Stripes

If you have short nails, vertical lines can help elongate them. Draw three or four thin lines of different pastels from the cuticle to the tip. It creates a “striped candy” look that is very festive.
19. Cloud Tips

Instead of a straight French tip, paint three overlapping white dots to create a fluffy cloud. Use a light blue base for the “sky.” It’s a whimsical take on a classic style that anyone can master :).
20. Pressed Flower Decals

If you can’t draw flowers, use real ones. You can buy tiny dried flowers online that sit flat on the nail. Seal them with a thick layer of top coat for a botanical masterpiece that looks incredibly professional.
21. Geometric Color Blocking

Use tape to create sharp triangles or squares on your nails. Fill each section with a different Easter pastel. The clean lines keep the multi-colored look from feeling too childish.
Textures & Special Effects
Sometimes, the finish of the polish does all the heavy lifting for you. These 27 Easter themed nail designs that are absolutely egg-cellent rely on cool technology and interesting finishes.
22. Iridescent Chrome
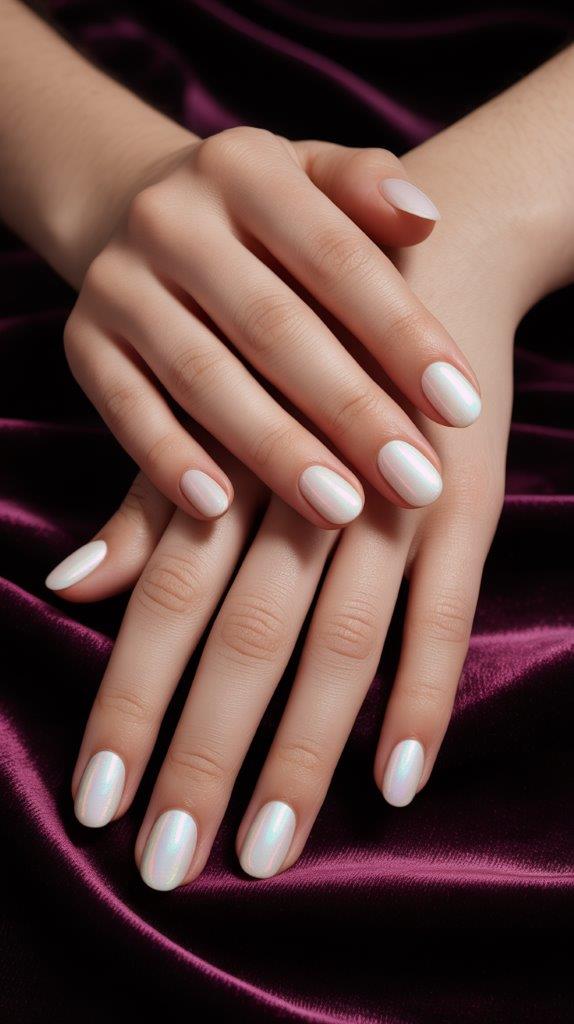
Chrome isn’t just for silver and gold anymore. I love a pearl-finish chrome powder over a light pink base. It gives the nails a holographic glow that changes color every time you move your hand.
23. Velvet “Cat Eye” Polish
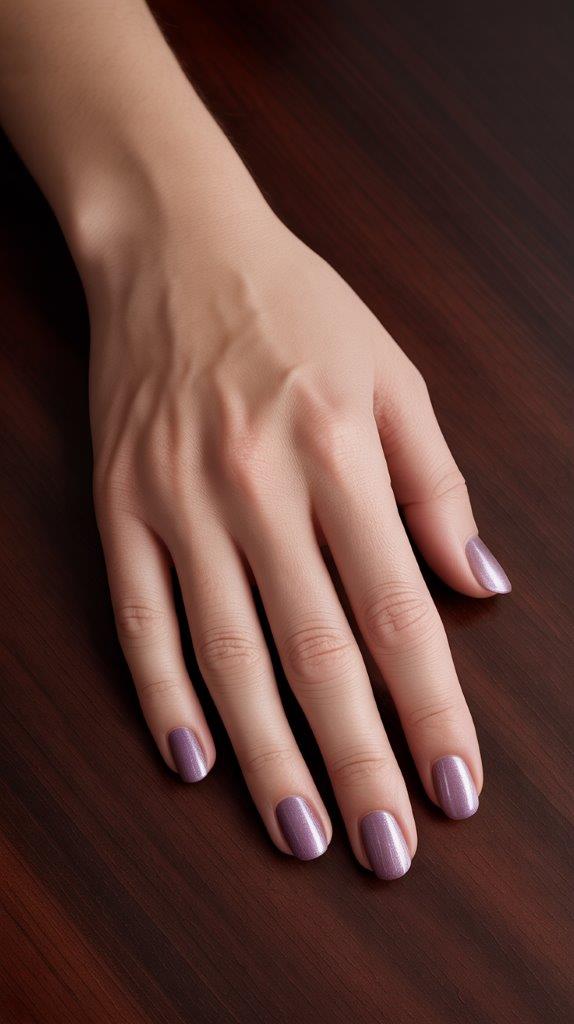
Cat eye polish uses magnets to move metallic particles around. For Easter, pick a lavender or mint magnetic polish. It creates a soft, velvet-like shimmer that looks like a luxury fabric.
24. Jelly Bean Translucence

“Jelly” polishes are sheer and have a high-gloss, squishy finish. Paint three coats of a bright translucent orange or purple. It looks exactly like a gourmet jelly bean and makes your nails look healthy and plump.
25. Gold Leaf Accents

Buy a small pot of gold foil flakes from a craft store. While your polish is still tacky, press small bits of foil onto the surface. It adds an organic, “royal” touch to even the simplest manicure.
26. 3D “Drip” Nails

Use a thick builder gel to create raised “drips” of polish coming down from your tips. If you use pastel colors, it looks like melting icing on a sugar cookie. It’s a tactile and fun way to stand out.
27. Sparkling Sugar Coating

Finish any design with a chunky, iridescent glitter top coat. It mimics the sugar-coated texture of marshmallow Peeps. FYI, this is the easiest way to save a manicure that you’ve accidentally smudged.
How to Choose the Right Design for Your Skill Level
I know that list looks a bit daunting, so let’s break it down. You should choose a design based on how much time you actually have and how steady your hands feel today.
- The Beginner: Stick to the Skittle Mani, Robin’s Egg Speckle, or Champagne Metallic. These require zero “drawing” skills and rely on the bottle brush or simple flicking techniques.
- The Intermediate: Try the Abstract Swirls or Cloud Tips. You’ll need a separate detailing brush, but you don’t need to worry about perfect symmetry.
- The Pro: Go for the Gingham Print or the Peeking Chick. These require a steady hand and an understanding of layering different colors without them bleeding into each other.
Personally, I usually land in the intermediate category. I love a design that looks like I spent hours on it, even if I actually just used a few clever tricks.
Essential Tools for Your DIY Easter Session
If you want your nails to look “egg-cellent” rather than “egg-regious,” you need the right tools. I’ve wasted years trying to use toothpicks, and while they work in a pinch, real tools make a world of difference.
- Detailing Brushes: You can find these for a few dollars on Amazon. They are much thinner than the brush that comes in the bottle.
- Dotting Tools: These help you make perfectly round eyes for your chicks or centers for your daisies.
- A Good Base Coat: Never skip this. It prevents your nails from staining and gives the polish something to grip onto.
- A Clean-up Brush: Keep a small, flat brush dipped in acetone nearby. You use it to “erase” any polish that gets on your skin for a crisp, salon-quality edge.
I’ve found that high-quality tools actually save me time because I don’t have to redo my work as often. Ever noticed how a professional’s lines are so sharp? It’s usually the brush, not just the talent.
Comparing Gel vs. Regular Polish for Easter
I get asked this all the time: “Should I use gel or regular polish?” The answer depends on your lifestyle.
Gel Polish provides a hard, indestructible shell. If you plan on doing a lot of Easter egg hunting or cooking a big family dinner, go with gel. It stays shiny for three weeks and won’t chip the second you reach into your purse for your keys.
Regular Polish is better if you like to change your look frequently. Maybe you want bunnies for the weekend but need a neutral look for a meeting on Monday. Regular polish is much easier to remove and doesn’t require a UV lamp.
In my experience, gel is better for art. You can “flash cure” a design in 10 seconds, which prevents the colors from running together. If you’re doing the Abstract Swirls, gel will save you a lot of frustration.
Final Thoughts
Easter is the perfect excuse to step outside your comfort zone and try something a bit whimsical. Whether you choose a sophisticated Milky White or go all out with Peeking Yellow Chicks, your nails are a great way to express your personality.
Remember, these 27 Easter themed nail designs that are absolutely egg-cellent are just a starting point. Feel free to mix and match! Maybe you do a Skittle mani but add a tiny bunny ear on your thumb. The possibilities are as endless as the candy in an Easter basket.
I hope this list gives you the inspiration you need to grab your polish and get creative. Don’t worry about being perfect—the charm of a DIY manicure is that it’s yours. Happy Easter, and happy painting!
| Design Category | Maintenance Level | Best For |
| Minimalist | Low | Corporate offices, clean aesthetics |
| Character | High | Family gatherings, kids’ parties |
| Abstract | Medium | Creative individuals, shaky hands |
| Textured | Low | Hiding chips, adding “wow” factor |
Leave a Reply
You must be logged in to post a comment.