
Spring is finally poking its head out from behind those miserable winter clouds, and frankly, my nails look like they belong in a gothic Victorian novel. I spent months wearing nothing but moody burgundies and “I’m hiding from the sun” black. Now, I crave a palate cleanser. If you also feel the urge to retire the dark drama for something that screams “I actually go outside,” you need light pink.
I used to avoid pink because I thought it looked too much like a five-year-old’s birthday party. Then I discovered that the right shade of light pink makes your hands look tan, expensive, and incredibly clean. I’ve spent way too much money at the salon testing these out, so you don’t have to. Here are 17 light pink spring nail ideas that are cute and simple enough for even the most impatient DIYer.
Ever wondered why everyone suddenly switches to pink in March? It is the ultimate “reset” button for your aesthetic. Whether you have long stiletto nails or short “I type for a living” nails, these designs work. Let’s look at how you can transform your fingertips without spending three hours in a chair.
The “Clean Girl” Solids
Sometimes, the most sophisticated look requires the least effort. If you struggle with a steady hand, these solid-color ideas will save your life. You don’t need a degree in fine arts to make these look phenomenal.
1. The Milky “Strawberry Milk” Look
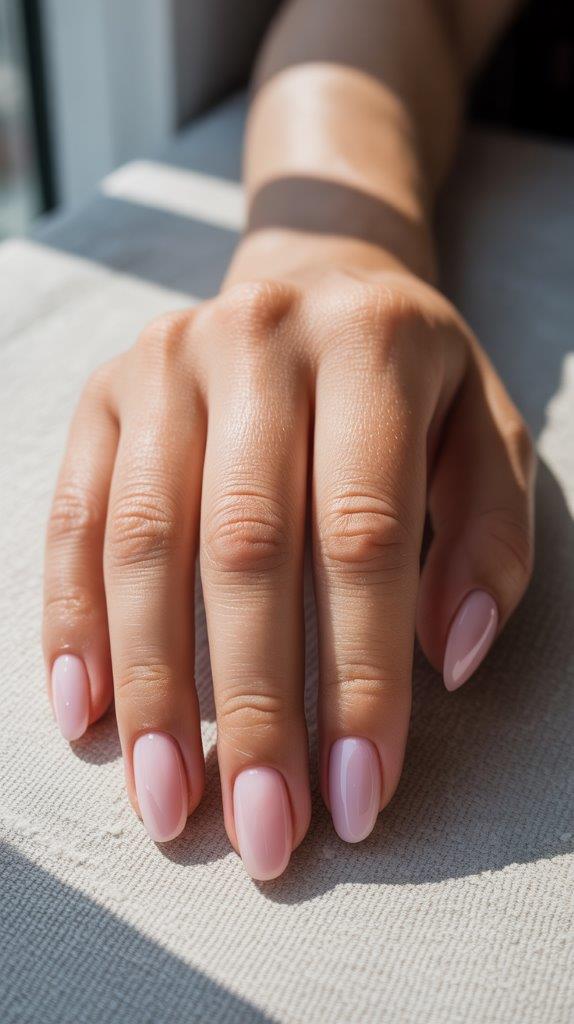
This is the holy grail of pink manicures right now. You aren’t looking for a solid, chalky pink that looks like Pepto Bismol. Instead, you want a sheer, translucent pink that looks like you dropped a splash of color into a glass of milk.
I recommend applying three very thin coats rather than one thick one. This prevents bubbles and gives you that “squishy” jelly finish that looks so high-end. It hides regrowth remarkably well, making it perfect for the low-maintenance crowd.
2. Opaque Pastel Bubblegum

If you prefer a more “pop” look, go for a solid opaque pastel. This shade stands out beautifully against spring floral dresses. I find that this specific shade makes my nails look much wider and healthier.
Always use a high-gloss top coat with this one. A matte finish can make opaque pink look a bit like plastic, and we want to look expensive, right? This is the ultimate “brunch with the girls” color.
3. The Matte Blush

I love a matte finish when I want to feel a bit more modern. Taking a standard blush pink and adding a matte top coat completely changes the vibe. It feels velvet-like and understated.
One thing to keep in mind: matte light colors show dirt more easily. If you spend your weekends gardening or eating messy tacos, maybe skip this one. But for a clean, office-ready look, it is hard to beat.
Minimalist Art for the Artistically Challenged
I once tried to paint a detailed bunny on my ring finger and it ended up looking like a confused potato. I’ve learned my lesson. These art ideas rely on simple shapes and tools you probably already have in your kitchen.
4. The Micro-French in Pink

The traditional white French tip can feel a bit stiff and dated. Swap that white for a vibrant light pink tip over a sheer base. I suggest keeping the line ultra-thin, almost like a hair-line.
This “micro” style elongates your fingers and looks incredibly chic on short nails. Use a long, thin detailing brush to get that crisp curve. If you mess up, just dip a brush in acetone and “carve” the line back into shape.
5. Dainty Daisy Accents

Flowers for spring? Groundbreaking. Sarcasm aside, tiny daisies are the easiest thing to paint. You just need a dotting tool or the end of a bobby pin.
Paint four or five white dots in a circle and place a single yellow dot in the center. I usually put these only on my thumb and ring finger to keep it from looking too busy. It adds a touch of “cottagecore” whimsy without much work.
6. Single Heart Detail

Since light pink is already romantic, a tiny heart feels like a natural fit. Instead of painting it in the center, I like to place a small red or dark pink heart right at the base of the nail.
This works best over a very sheer, milky base. It’s a “hidden” detail that people only notice when they look closely at your hands. IMO, it’s much cooler than a full set of hearts :).
7. Negative Space Half-Moons

Negative space is a lifesaver for people who hate visiting the salon every two weeks. You leave the “half-moon” at the base of your nail unpainted and cover the rest in light pink.
As your nail grows, the gap blends in with your natural nail bed. It looks intentional and architectural rather than neglected. I personally love this for a more “artsy” vibe.
Shimmer, Chrome, and Special Finishes
If you want your nails to catch the light during those rare spring sunny days, you need some texture. These finishes do all the heavy lifting for you so you don’t have to worry about “art” at all.
8. The Pearl Chrome “Glazed” Look

We can all thank Hailey Bieber for making this the most requested nail trend of the century. You start with a sheer pink base and rub in a white pearl chrome powder.
It creates an iridescent glow that looks like the inside of a seashell. I love how it shifts colors when I move my hands. It is the perfect choice for a spring wedding or a fancy event where you want to sparkle without being “glittery.”
9. Rose Gold Foil Flecks

I am obsessed with foil because it is literally impossible to mess up. You just dab tiny fragments of rose gold foil onto a tacky pink base.
Because the foil is meant to look jagged and organic, you don’t need a steady hand. It adds a bit of luxury and texture that looks very artisanal. Seal it with a thick top coat to ensure the edges don’t snag on your favorite spring sweater.
10. Holographic Pink Shimmer

If you want something a bit more fun, go for a holographic shimmer. Unlike chunky glitter, “holo” uses micro-particles that reflect the entire rainbow.
In the shade, it looks like a standard light pink. But once the sun hits it? It’s a party on your fingertips. I find this much easier to remove than traditional glitter, which usually requires a jackhammer to get off.
11. Pink Quartz Marble
Marble nails look like they require a professional, but I have a secret for you. You can achieve this by swirling a few drops of white and pink into a clear top coat while it’s still wet.
The colors blend together to mimic the look of rose quartz stone. Every nail will look slightly different, which adds to the organic charm. It is one of the most “classy” light pink spring nail ideas on this list.
Playful Patterns
If you’re feeling a bit more adventurous, these patterns add some personality to your light pink base. They still fall under the “simple” category because they rely on repetition.
12. Soft Pink Polka Dots
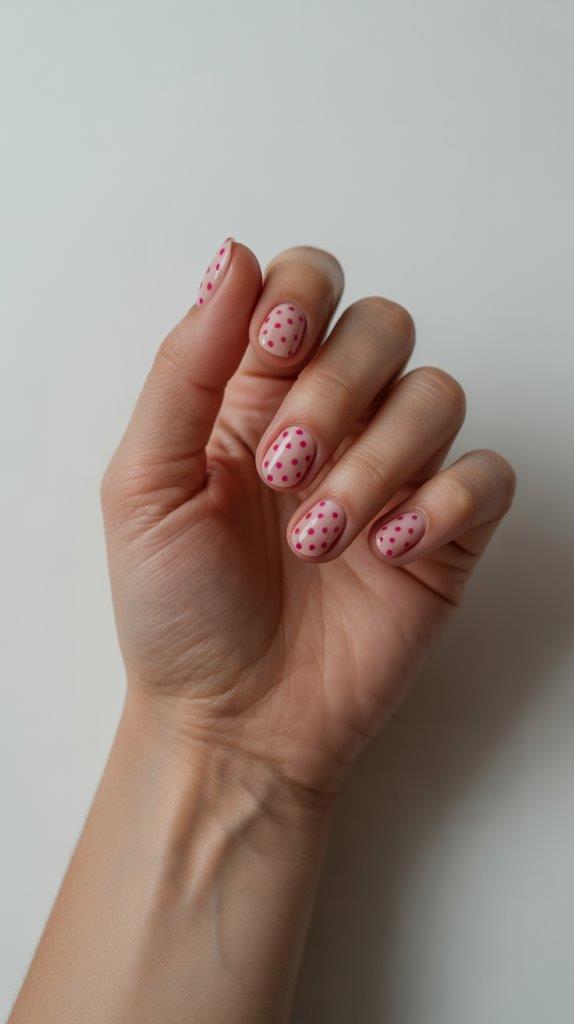
Polka dots are the ultimate “oops, I have five minutes” design. Use a slightly darker pink over a light pink base for a subtle, monochromatic look.
I suggest keeping the dots small and spaced out. If you make them too large, you risk looking like a Minnie Mouse cosplayer. Keep them dainty for a more adult, sophisticated take on the trend.
13. Minimalist Pink Swirls

Abstract swirls are great because there is no “wrong” way to draw them. Take a thin brush and sweep a few wavy lines across the nail.
I like to use a mix of white and a darker pink for the swirls over a light pink base. It gives the nail some movement and depth. Ever wondered why this works so well? It breaks up the solid color and makes short nails look much longer.
14. Cherry Blossom Tips
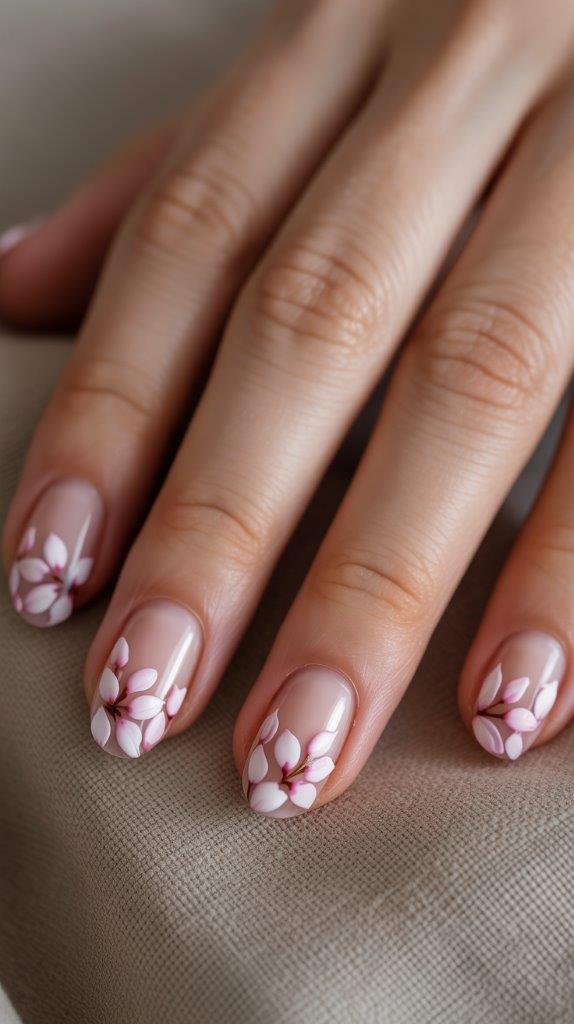
You don’t need to paint a whole tree. Just place a few small pink and white clusters at the very tip of your nails.
It mimics the look of falling petals. It is incredibly seasonal and feels very fresh. This is my go-to look for the first week of April every single year.
15. The Pink Gradient (Skittles Style)

Can’t pick just one shade of light pink? Don’t. Buy five different shades that go from nearly white to a dusty rose.
Paint each finger a different shade in order. It creates a beautiful gradient across your hand that requires zero actual art skills. FYI, this is the easiest way to look like you know what you’re doing with your manicure.
16. Vertical Pink Stripes

If you want to trick the eye into thinking your nails are longer, use vertical lines. I draw a single thin white line down the center of each pink nail.
It creates a sporty, “preppy” look that pairs perfectly with a crisp white button-down shirt. It is clean, modern, and very easy to achieve with a striping brush or even a piece of thread.
17. Sparkling Pink Ombre

For a bit of glamour, try a glitter ombre. Apply a fine pink glitter only at the base of the nail and fade it out toward the center.
It looks like your nails are “glowing” from the cuticle. It’s a great way to hide a messy cuticle job too—not that I would know anything about that. This design is festive but still feels light and airy for the spring season.
Why Light Pink is the Ultimate Spring Choice
I’ve tried every color under the sun, from neon green to “goth” navy. Nothing beats light pink for spring. It reflects the blooming flowers and the lighter wardrobe we all start wearing.
But beyond the aesthetics, light pink is incredibly practical. It hides chips much better than dark colors. If you chip a navy blue nail, it looks like a gaping hole. If you chip a light pink nail, nobody notices but you.
Also, light pink is universally flattering. Whether you have cool undertones or warm undertones, there is a shade of pink that will make your skin look radiant. I personally prefer “cool” pinks with a blue undertone to help my hands look less red after a long day.
How to Make Your Light Pink Mani Last
You’ve spent the time picking one of these 17 light pink spring nail ideas that are cute and simple, so let’s make it last. Spring is a busy time—we’re cleaning houses, gardening, and actually leaving the house.
- Prep the nail plate: Wipe your nails with 90% isopropyl alcohol before painting. This removes oils that cause the polish to lift.
- Seal the free edge: When you apply your top coat, run the brush along the very edge of your nail. This “caps” the polish and prevents it from peeling back.
- Use cuticle oil daily: I keep a bottle at my desk. Hydrated nails are flexible; dry nails are brittle and chip-prone.
- Reapply top coat: Every three days, add another thin layer of top coat. This refreshes the shine and adds a new layer of protection.
I once managed to keep a light pink manicure looking fresh for 12 days just by following these steps. It’s all about the maintenance!
Comparing Gel vs. Regular Polish for Spring
I get asked this all the time: “Is gel worth it?” It depends on your lifestyle.
Gel Polish is a beast. It stays shiny for three weeks and won’t chip even if you’re scrubbing your baseboards. However, the removal process can be a nightmare if you aren’t patient. I only use gel when I have a string of events or a vacation planned.
Regular Polish is my everyday choice. I love being able to change my color on a Sunday night while watching a movie. Plus, newer “long-wear” formulas are getting scarily close to gel longevity without the UV lamp. If you like switching up your look frequently, stick to regular polish.
Essential Tools for DIY Nail Art
You don’t need a professional kit, but a few basics will make these 17 designs much easier to pull off.
- A fine detailing brush: For the French tips and swirls.
- A dotting tool: For the daisies and polka dots.
- Cleanup brush: A small, flat brush you dip in acetone to fix messy edges.
- High-quality top coat: Don’t buy the cheap stuff. A good top coat is the difference between “I did this in my sleep” and “I just left the salon.”
I’ve found that the “clean-up brush” is actually the most important tool. It turns a “C-” manicure into an “A+” manicure in about 30 seconds.
Final Thoughts on Spring Pink
At the end of the day, your nails should make you happy. There is something so satisfying about looking down at a fresh, light pink manicure. It makes me feel like I have my life together, even if my laundry pile says otherwise.
Which of these 17 light pink spring nail ideas that are cute and simple are you going to try first? I think I’m going for the Milky Strawberry Milk with a tiny daisy accent. It’s the perfect balance of “clean girl” and “spring enthusiast.”
Remember to take your time, keep your coats thin, and don’t forget the cuticle oil. Your hands do a lot for you, so give them a little love this season. Happy painting, and may your top coat never bubble! 🙂
Leave a Reply
You must be logged in to post a comment.